

DIY Charcuterie at Home: Tips from the Pros for Stunning Boards
Creating a beautiful charcuterie board at home doesn't require professional training—just the right knowledge, quality ingredients, and a few insider tricks that we're excited to share with you.
Before You Begin: Essential Tools
Success starts with having the right tools. You don't need to invest in expensive equipment, but these basics will make your charcuterie creation much easier and more professional-looking.
Must-Have Tools
- • Large wooden board or marble slab
- • Sharp cheese knives (at least 2)
- • Small spoons for spreads
- • Small bowls for olives and nuts
- • Cheese labels (optional but helpful)
Nice-to-Have Items
- • Cheese plane for hard cheeses
- • Small offset spatula
- • Tweezers for precise placement
- • Fresh herbs for garnish
- • Cloth napkins for cleanup
Shopping Like a Pro
The foundation of any great charcuterie board is quality ingredients. Here's how to shop smart and get the best value for your money:
Where to Shop
Specialty Cheese Shops
Best for: Unique cheeses, expert advice, taste-testing opportunities. Many will slice meats and cheeses to order.
Quality Grocery Stores
Best for: One-stop shopping, competitive prices on basics, good selection of crackers and accompaniments.
Warehouse Stores
Best for: Large parties, bulk buying, excellent value on nuts and dried fruits.
Money-Saving Tips
- • Buy cheese ends and have them sliced—often 30% cheaper
- • Purchase whole cured meats and slice at home
- • Mix expensive artisanal items with quality grocery store finds
- • Shop seasonal fruits for the best prices and flavors
- • Make your own spreads—fig jam and honey butter are surprisingly easy
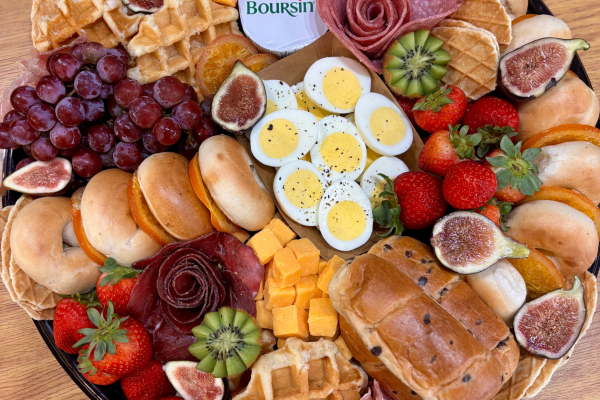
The Assembly Process: Step by Step
Professional-looking boards follow a specific assembly order. This systematic approach ensures balanced distribution and prevents that "thrown together" look.
Step 1: Prepare Your Foundation (30 minutes before)
- • Remove cheeses from refrigeration to reach room temperature
- • Pre-slice hard cheeses and arrange on separate plates
- • Fill small bowls with olives, nuts, and spreads
- • Gather your crackers and breads
Step 2: Place Your Anchors
- • Start with your largest cheese wheels and wedges
- • Position small bowls for olives and spreads
- • These "anchors" determine your board's flow
- • Aim for asymmetrical balance—avoid perfect symmetry
Step 3: Add Your Meats
- • Fold salami and sopressata for height and texture
- • Roll prosciutto into loose cylinders
- • Fan out rectangular slices for visual interest
- • Fill gaps between cheeses naturally
Step 4: Fill and Garnish
- • Arrange crackers in overlapping patterns
- • Add fresh fruits in clusters
- • Sprinkle nuts in empty spaces
- • Finish with fresh herbs and edible flowers
Pro Presentation Techniques
The "Height Rule"
Create visual interest by varying heights across your board. Use small bowls to elevate some items, fold meats for dimension, and let some elements naturally spill over edges. A flat board is a boring board!
Color and Contrast
Think like an artist when arranging your board. Distribute colors evenly—don't cluster all your red items together. Create contrast by placing light items next to dark ones, and smooth textures next to rough ones.
Reds
Salami, strawberries, red grapes, red peppers
Yellows
Aged cheddars, mustard, golden crackers, dried apricots
Greens
Olives, herbs, grapes, pistachios
Common Mistakes to Avoid
❌ Overcrowding
Leave some breathing room. A cluttered board is hard to eat from and looks chaotic.
❌ Forgetting Knives
Each cheese needs its own knife to prevent flavor mixing. Label them if necessary.
❌ Cold Cheese
Cold cheese has muted flavors. Plan for 30-60 minutes of room temperature time.
❌ Wrong Proportions
Aim for 60% cheese and meat, 40% accompaniments. Don't let crackers dominate.
Make-Ahead Tips
Planning ahead can reduce stress and improve your results. Here's what you can prepare in advance:
Day Before
- • Shop for all ingredients
- • Wash and prep fresh fruits
- • Make homemade spreads
- • Clean and organize tools
Day Of (2-3 hours ahead)
- • Pre-slice hard cheeses
- • Fill small bowls
- • Arrange non-perishables
- • Cover and refrigerate
Ready to Take Your Skills Further?
Join us for hands-on charcuterie workshops where you'll learn these techniques and more. Or let our experts handle the work while you learn by watching—we offer both DIY guidance and full-service options.